This section contains instructions for creating an OAuth Client.
The Things Stack uses the OAuth 2.0 protocol for authentication and authorization.
Considerations
When you register an OAuth client, you should keep in mind that it will have to be approved by an administrator. The scope and duration of the review process depends on the network where you register your OAuth client. If you register in The Things Stack Cloud, Enterprise or Open Source, then the administrator (probably you) can approve it right away. If you register an OAuth client on The Things Stack Sandbox, the administrators will take some time to review if and how the OAuth client benefits the community.
Guidelines for creation of OAuth clients on The Things Stack Sandbox
When reviewing the requests of new OAuth clients, administrators always validate the following:
- The ID and name of the user / organization that owns the OAuth client should clearly identify who is providing the service.
- For public clients, this should typically be an organization with the brand name as ID.
- For private/testing clients this can also be a user ID.
- For personal testing clients, approval should not be needed.
- IDs or names that could be confused with official TTN IDs/names will be rejected.
- The ID of the OAuth client should ideally consist of the brand name of the application and the purpose of the OAuth client.
- Example: “mycompany-gateway-onboarding”.
- Keep in mind that you can’t change the Client ID after registration, and you can’t re-use the Client ID after deletion.
- The name and description should be clear.
- The name is typically the capitalized form of the ID.
- Example: “MyBrand Gateway Manager”
- The description should explain to users what the application does.
- Example: “Manage your MyBrand gateway from the mobile app”
- The name is typically the capitalized form of the ID.
- The redirect URI(s) should work.
- The logout redirect URI(s) are optional.
- The password grant should never be used. No exceptions.
- The refresh_token grant should only be used when non-interactive access is clearly required.
- The rights should be appropriate given the name and description of the OAuth client.
Parameters Overview
A few parameters listed below are usually used to describe an OAuth client.
- The client ID uniquely identifies the OAuth client. Its restrictions are the same as for any other ID in The Things Stack.
- The description is shown to the user when you request authorization.
- The rights indicates what actions your OAuth client is allowed to perform. This is shown to the user when performing an authorization request. A full list of rights can also be found in the message reference.
- The redirect URI is where the user is redirected after authorizing your OAuth client. At least one redirect URI must be configured while registering the OAuth client.
- The client secret is issued when your OAuth client registration is accepted by a network administrator.
Adding OAuth clients using the Console
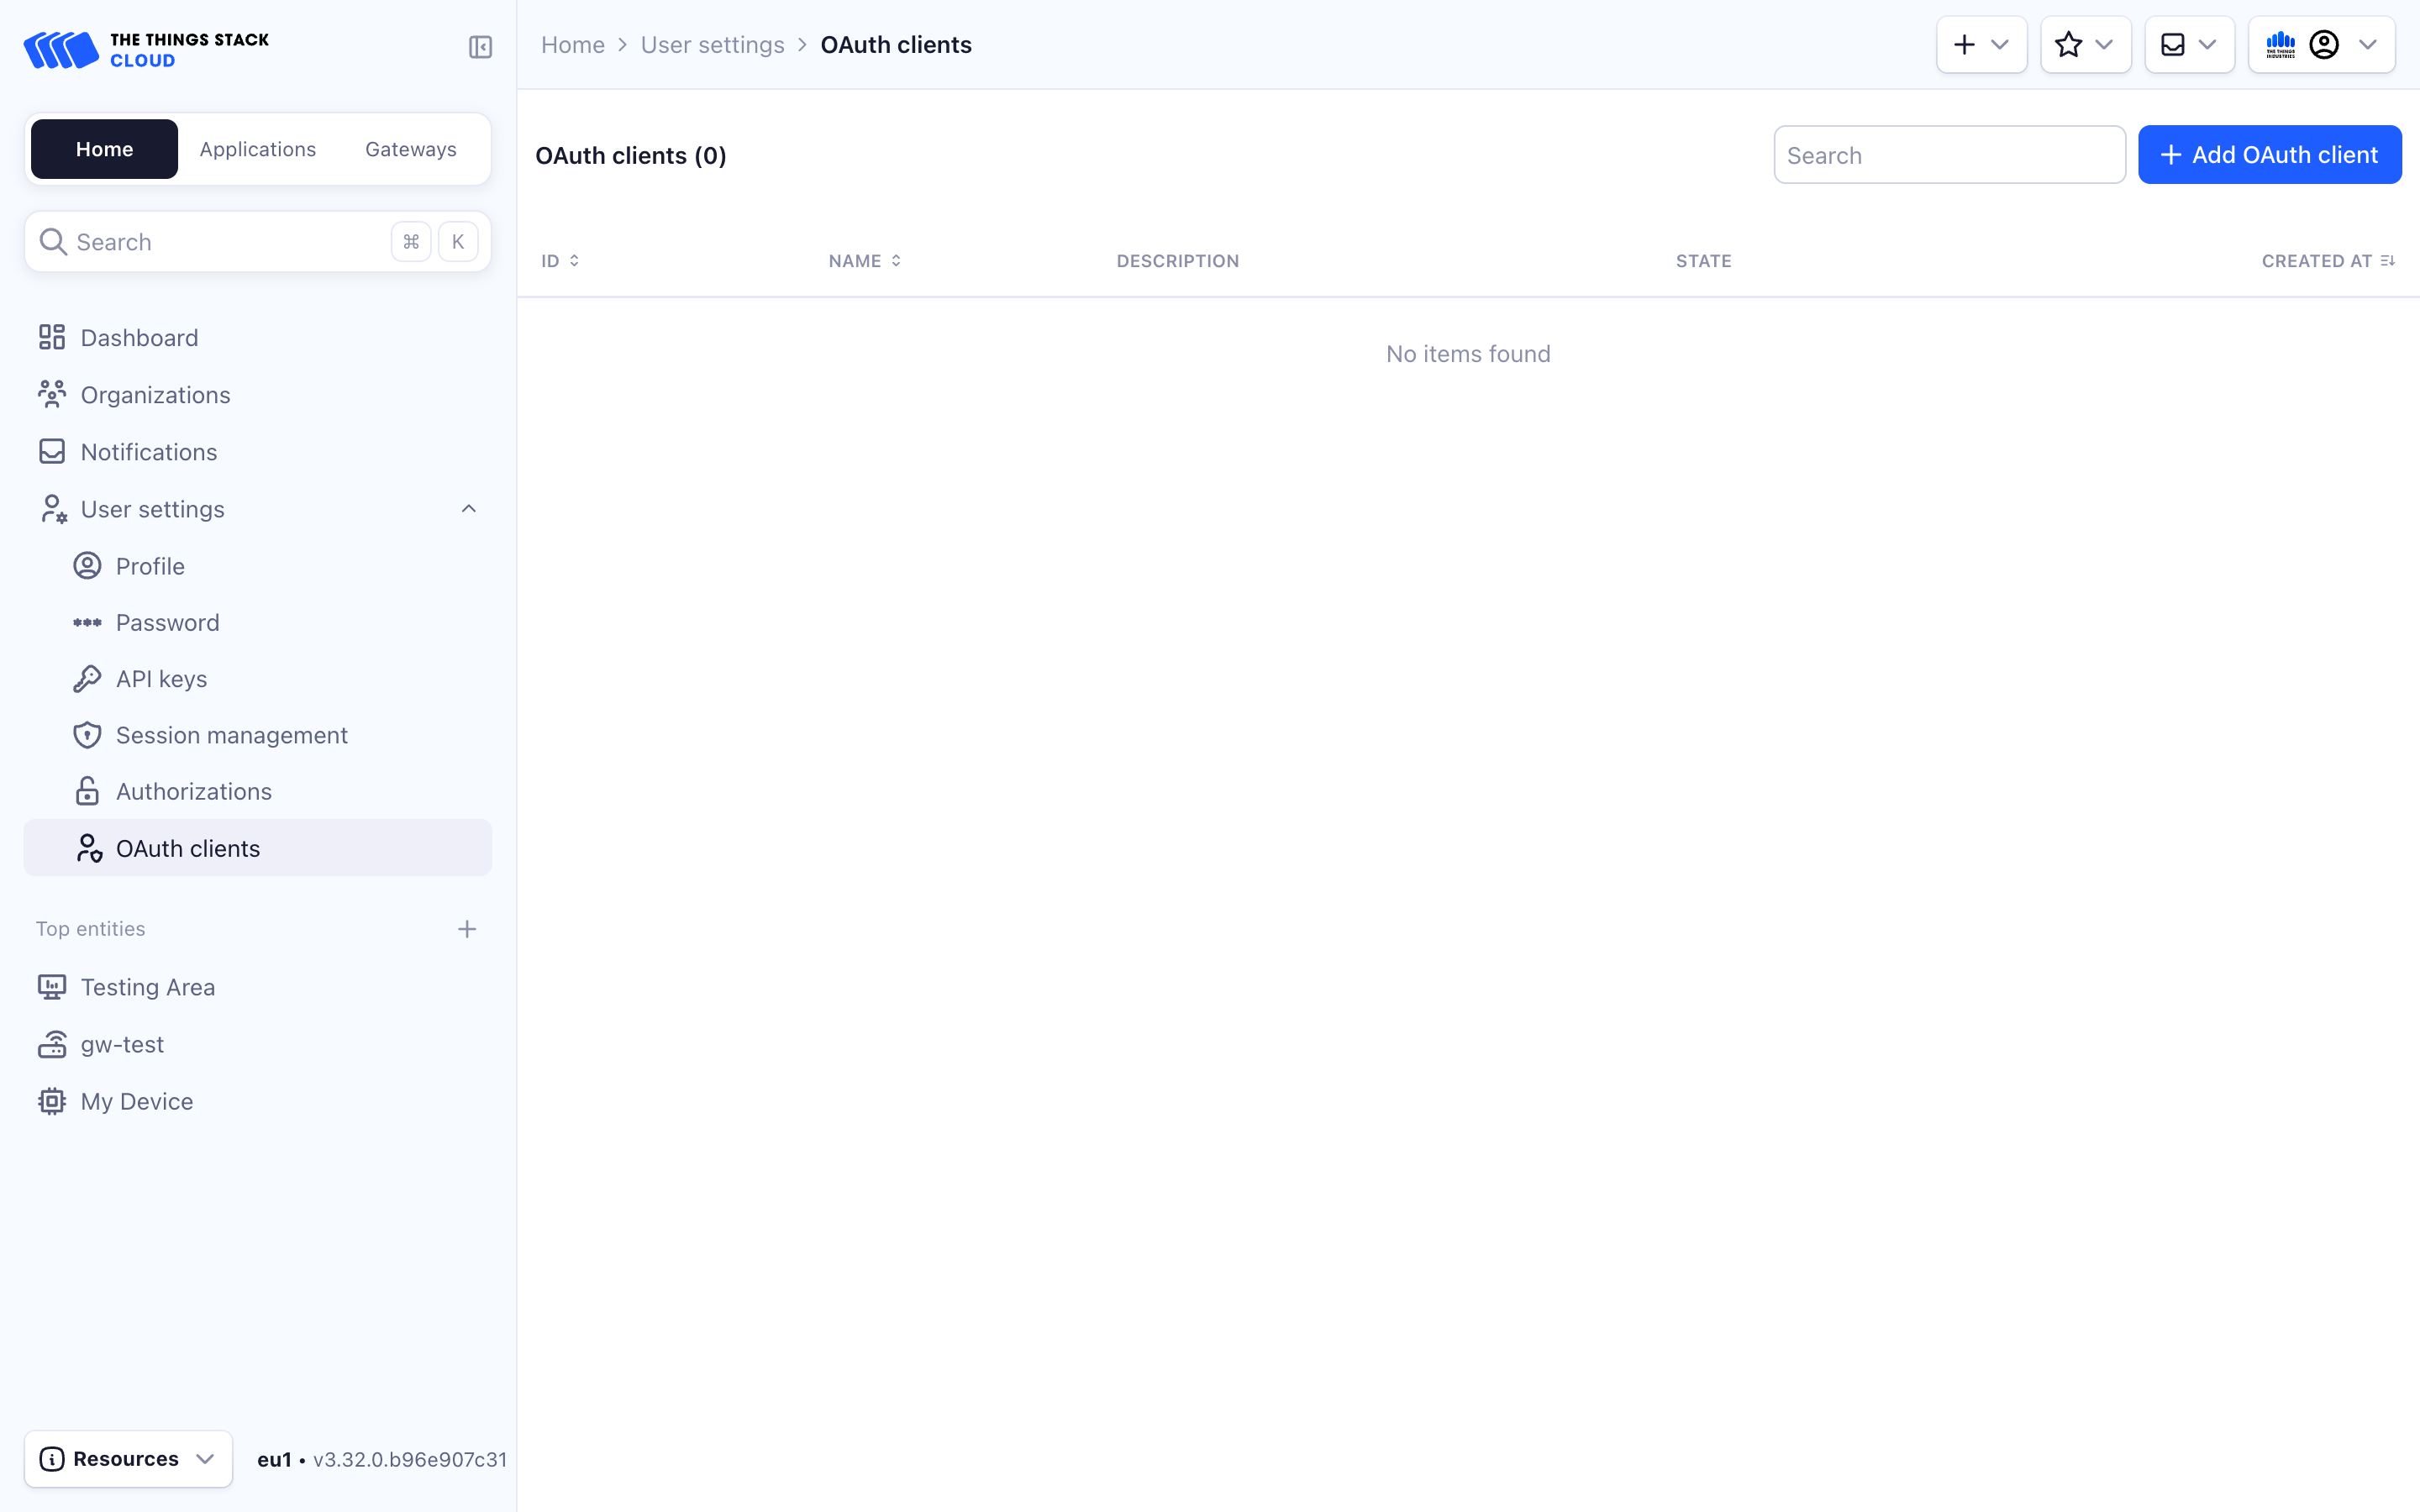
To register an OAuth client using the Console, click the User settings dropdown in the left-hand sidebar and select OAuth clients. Then click + Add OAuth client in the top-right.

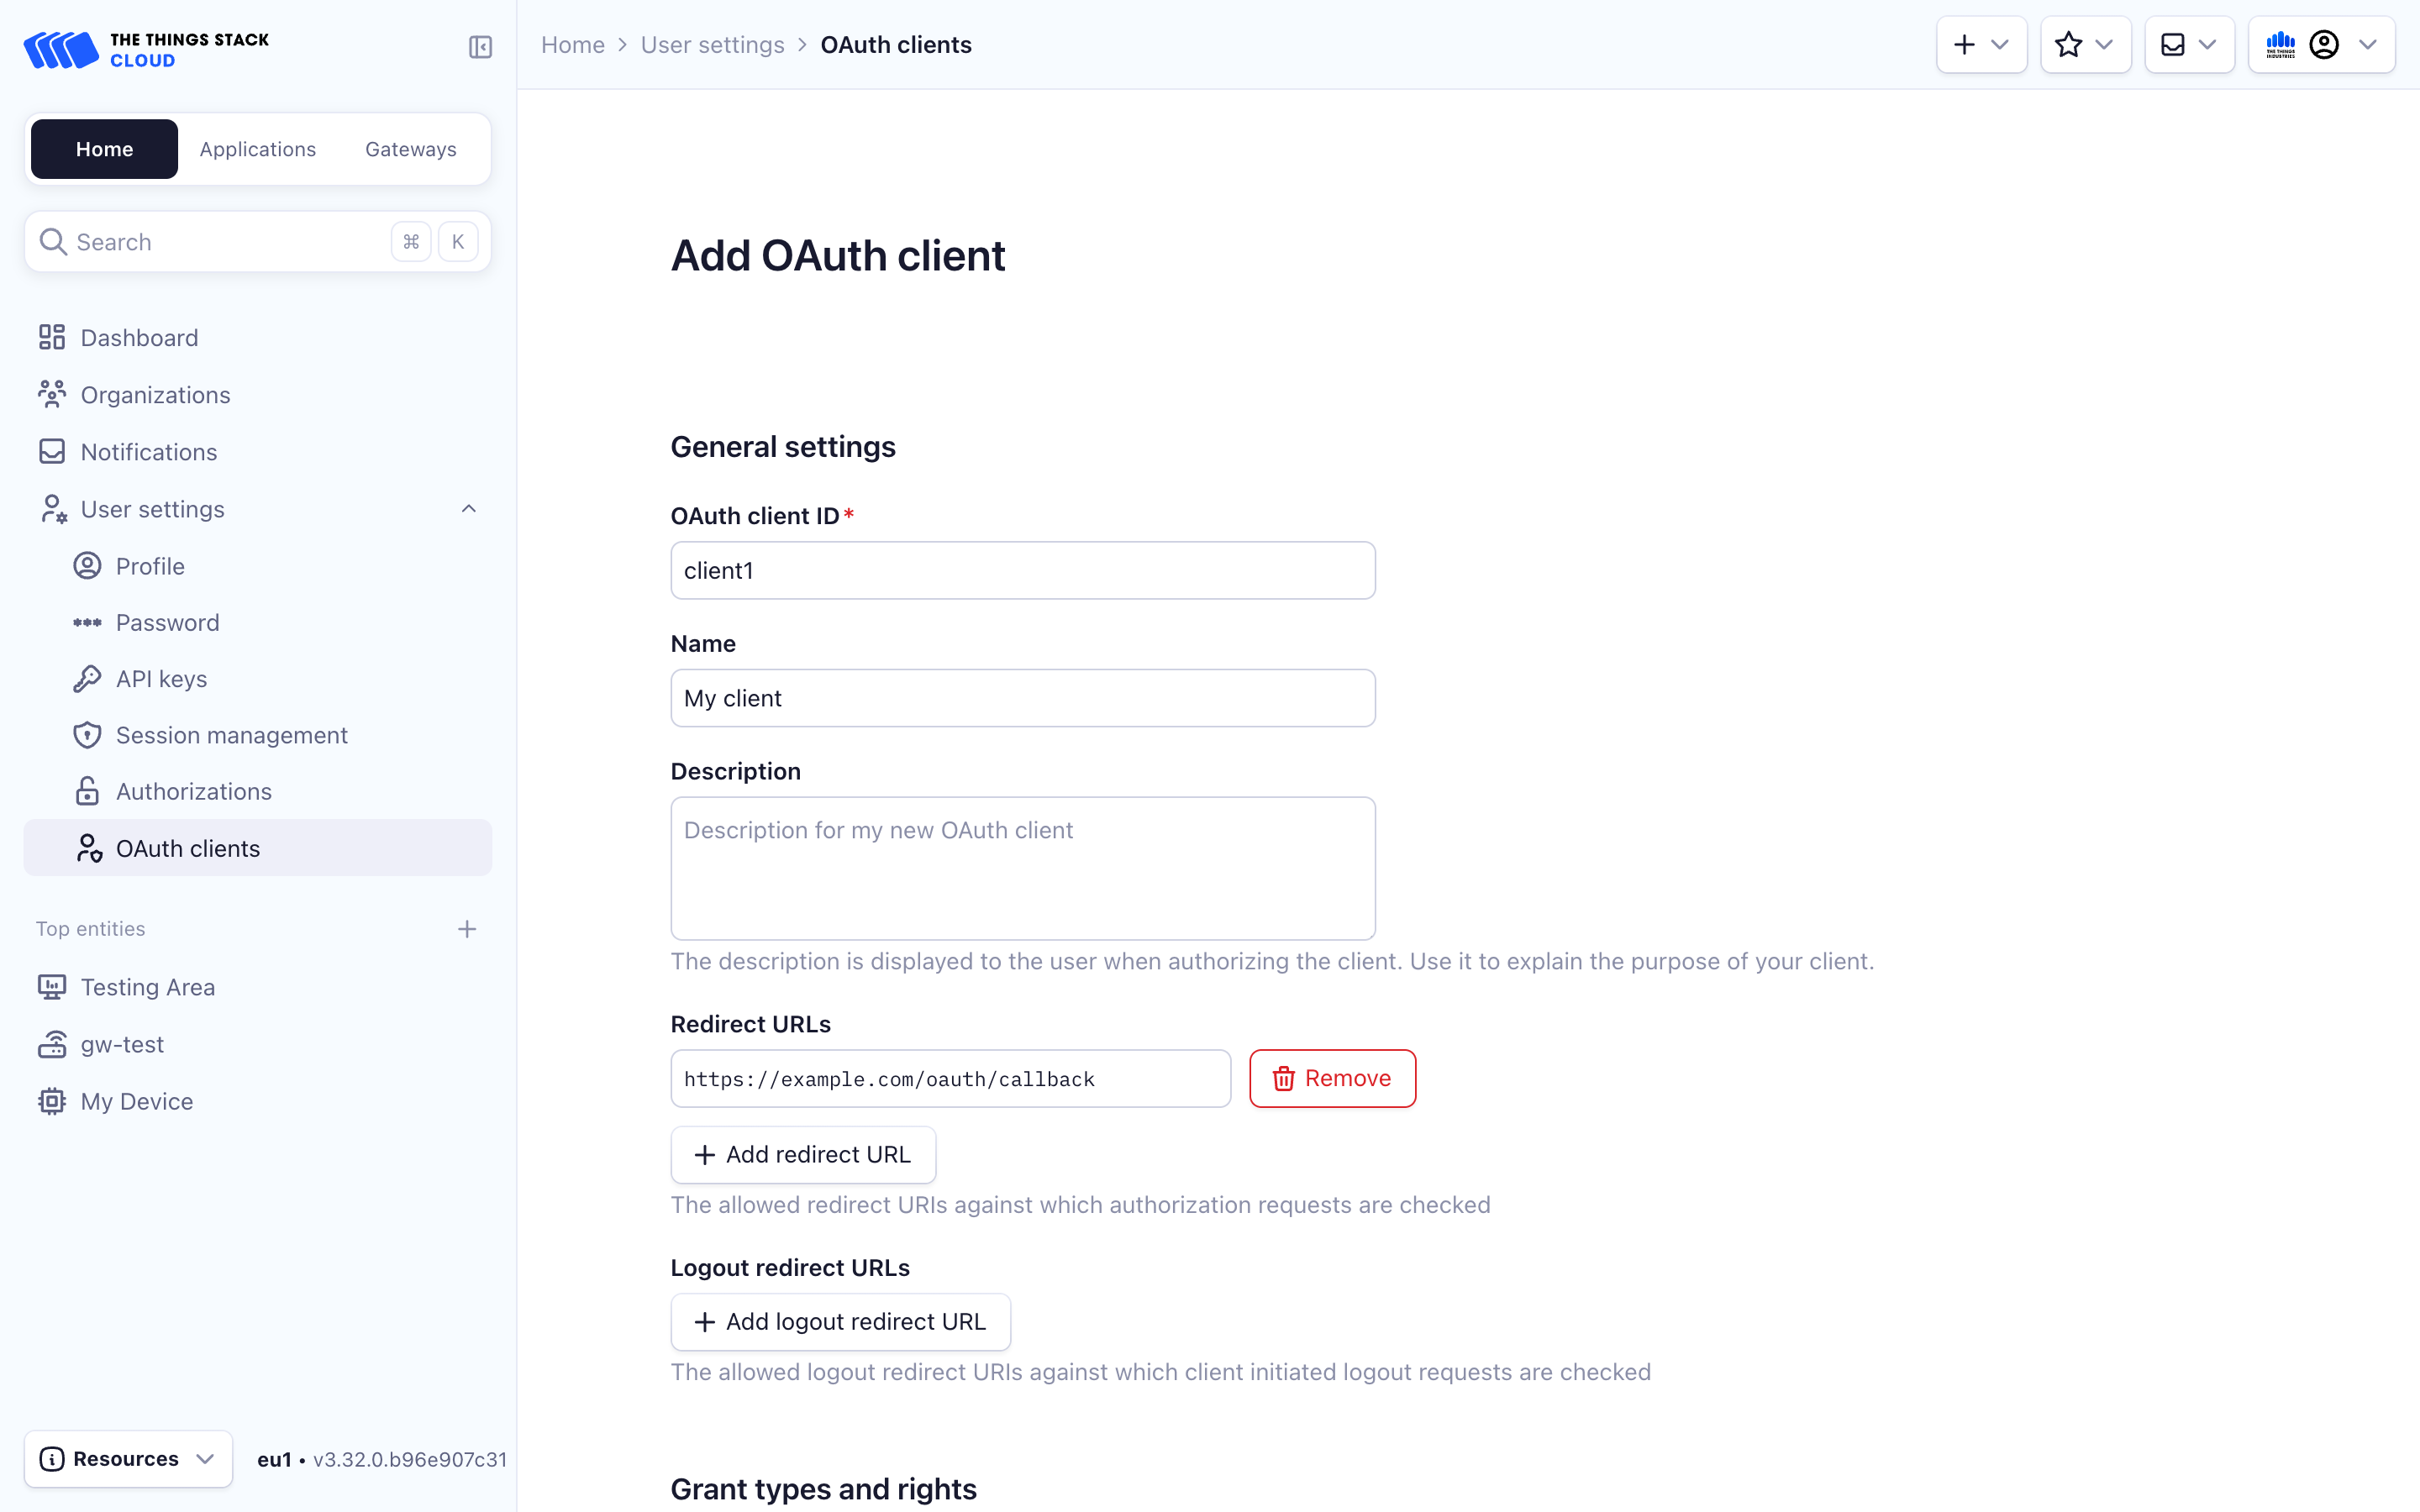
Enter the OAuth Client ID, Name and Description for your OAuth client. You can also add the Redirect URLs against which authorization requests will be checked, and Logout redirect URLs agains which client initiated requests are checked.

Some Advanced administrator options are also available to set the state of the OAuth client, skip the authorization page or indicate endorsement.
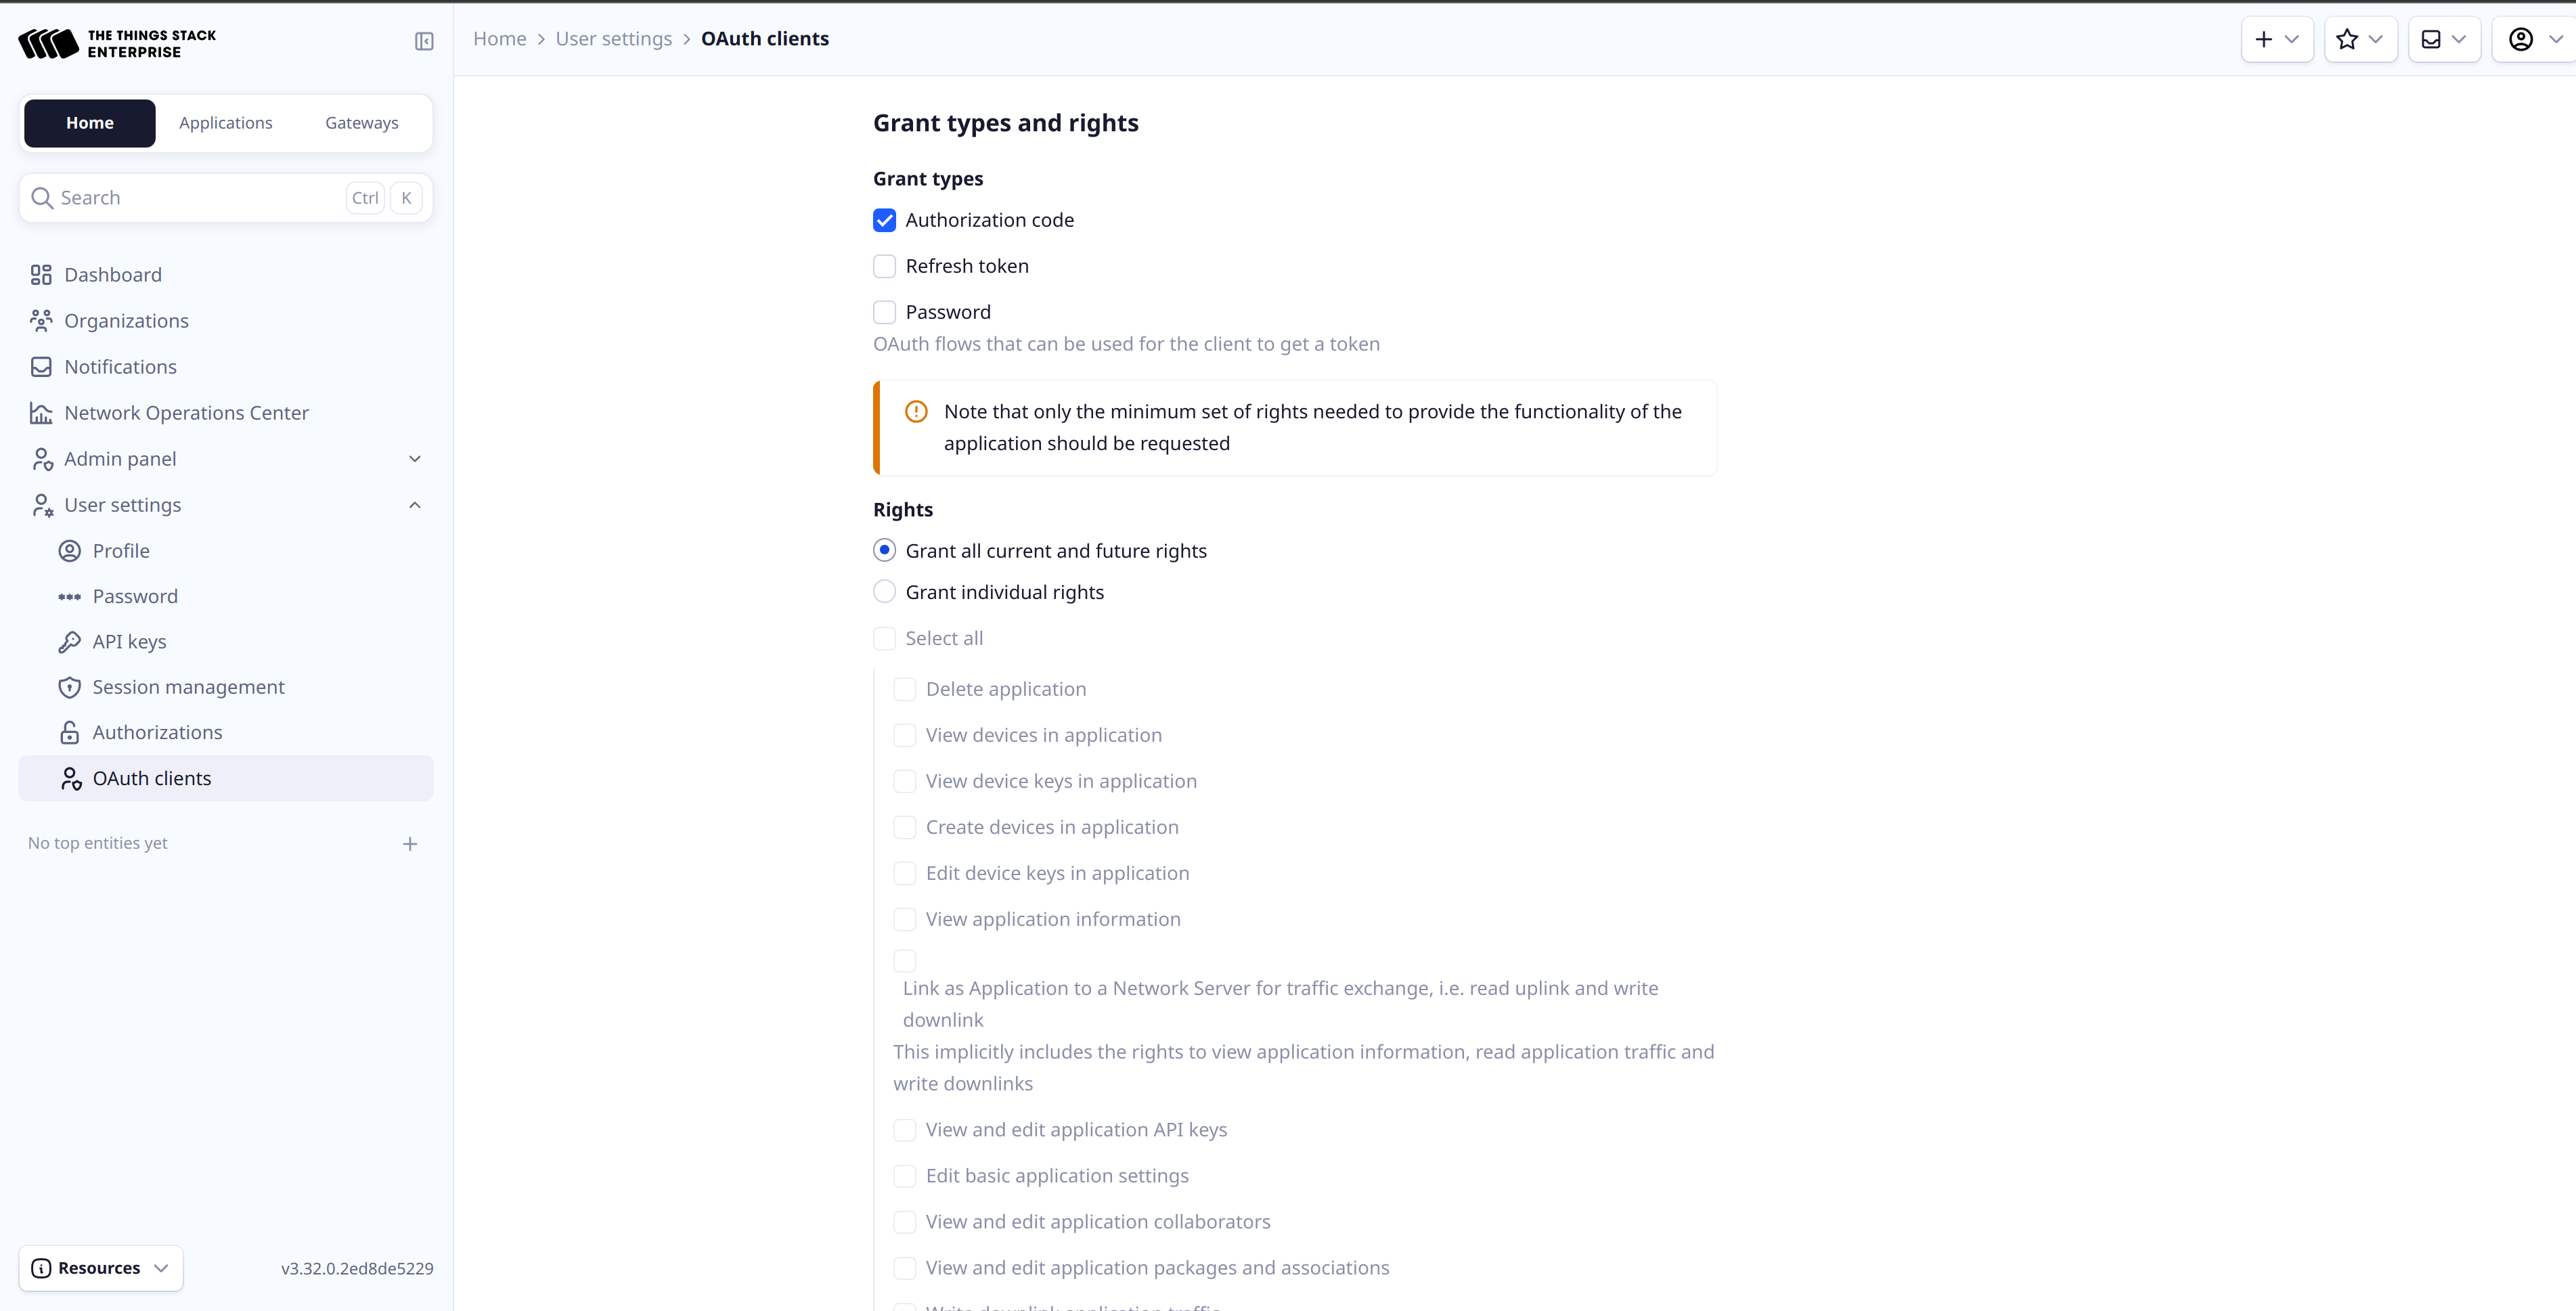
You can choose multiple Grant types, i.e. multiple OAuth flows that can be used for the client to obtain an OAuth token: Authorization code, Refresh token and Password.
You also need to grant rights for your OAuth client. Keep in mind that, to provide the functionality of the application, a minimum set of rights has to be requested.

Adding OAuth clients using the CLI
To register an OAuth client using the CLI, use the following command:
ttn-lw-cli clients create \
  --client-id <CLIENT-ID> \
  --name <CLIENT-NAME> \
  --description "My new OAuth client" \
  --redirect-uris <REDIRECT-URI> \
  --grants GRANT_AUTHORIZATION_CODE \
  --rights RIGHT_GATEWAY_ALL,RIGHT_ORGANIZATION_GATEWAYS_CREATE,RIGHT_ORGANIZATION_GATEWAYS_LIST,RIGHT_ORGANIZATION_INFO,RIGHT_USER_GATEWAYS_CREATE,RIGHT_USER_GATEWAYS_LIST,RIGHT_USER_INFO,RIGHT_USER_ORGANIZATIONS_LIST
Adding OAuth clients using the HTTP (REST) API
Endpoint Details
Create OAuth client that belongs to an user.
| Item | Value |
|---|---|
| Endpoint | /users/{collaborator.user_ids.user_id}/clients |
| Request type | POST |
Create OAuth client that belongs to an organization.
| Item | Value |
|---|---|
| Endpoint | /organizations/{collaborator.organization_ids.organization_id}/clients |
| Request type | POST |
Example
To create a client my-test-client on thethings.example.com, first create a JSON file named req.json in the same folder with the following example contents.
{
  "client": {
    "ids": {
      "client_id": "my-test-client"
    },
    "name": "My Test OAuth",
    "description": "My Test OAuth description",
    "administrative_contact": {
      "user_ids": {
        "user_id": "testuser"
      }
    },
    "technical_contact": {
      "user_ids": {
        "user_id": "testuser"
      }
    },
    "redirect_uris": ["https://thethings.example.com"],
    "grants": ["GRANT_AUTHORIZATION_CODE"],
    "rights": [
      "RIGHT_GATEWAY_ALL",
      "RIGHT_ORGANIZATION_GATEWAYS_CREATE",
      "RIGHT_ORGANIZATION_GATEWAYS_LIST",
      "RIGHT_ORGANIZATION_INFO",
      "RIGHT_USER_GATEWAYS_CREATE",
      "RIGHT_USER_GATEWAYS_LIST",
      "RIGHT_USER_INFO",
      "RIGHT_USER_ORGANIZATIONS_LIST"
    ]
  },
  "collaborator": {
    "user_ids": {
      "user_id": "testuser"
    }
  }
}
The request using cURL is as follows.
curl -X POST -H "Content-Type: application/json" -H "Authorization: Bearer $API_KEY" \
-d @./req.json \
 https://thethings.example.com/api/v3/users/testuser/clients

{"ids":{"client_id":"my-test-client"},"created_at":"2024-09-16T17:52:30.975475Z","updated_at":"2024-09-16T17:52:30.975475Z","name":"My Test OAuth","description":"My Test OAuth description","administrative_contact":{"user_ids":{"user_id":"testuser"}},"technical_contact":{"user_ids":{"user_id":"testuser"}},"secret":"FG5K5HP64NVQUYCHKO4C5YLUZXCD6FAUCTI4HQQJZY7N75TTCT2A","redirect_uris":["https://thethings.example.com"],"grants":["GRANT_AUTHORIZATION_CODE"],"rights":["RIGHT_GATEWAY_ALL","RIGHT_ORGANIZATION_GATEWAYS_CREATE","RIGHT_ORGANIZATION_GATEWAYS_LIST","RIGHT_ORGANIZATION_INFO","RIGHT_USER_GATEWAYS_CREATE","RIGHT_USER_GATEWAYS_LIST","RIGHT_USER_INFO","RIGHT_USER_ORGANIZATIONS_LIST"]}
Additional information
For more details on how obtain access token from an approved OAuth client, consult the oauth access tokens section.