Activation by Personalization (ABP)
If your device cannot be activated using the more secure OTAA, you may manually activate it by programming security keys it, i.e. using ABP. This guide explains how to add ABP devices manually.
Click on the Show advanced activation, LoRaWAN class and cluster settings select Activation by Personalization (ABP).
Choose the appropriate Additional LoRaWAN class capabilities. When using ABP, it is important to make sure that the Rx1 settings in your device match those in The Things Stack. Uncheck Network Defaults to specify settings that match those in your device. The Things Stack recommends an Rx1 delay of 5 seconds, but this value would have to also be programmed into your device.
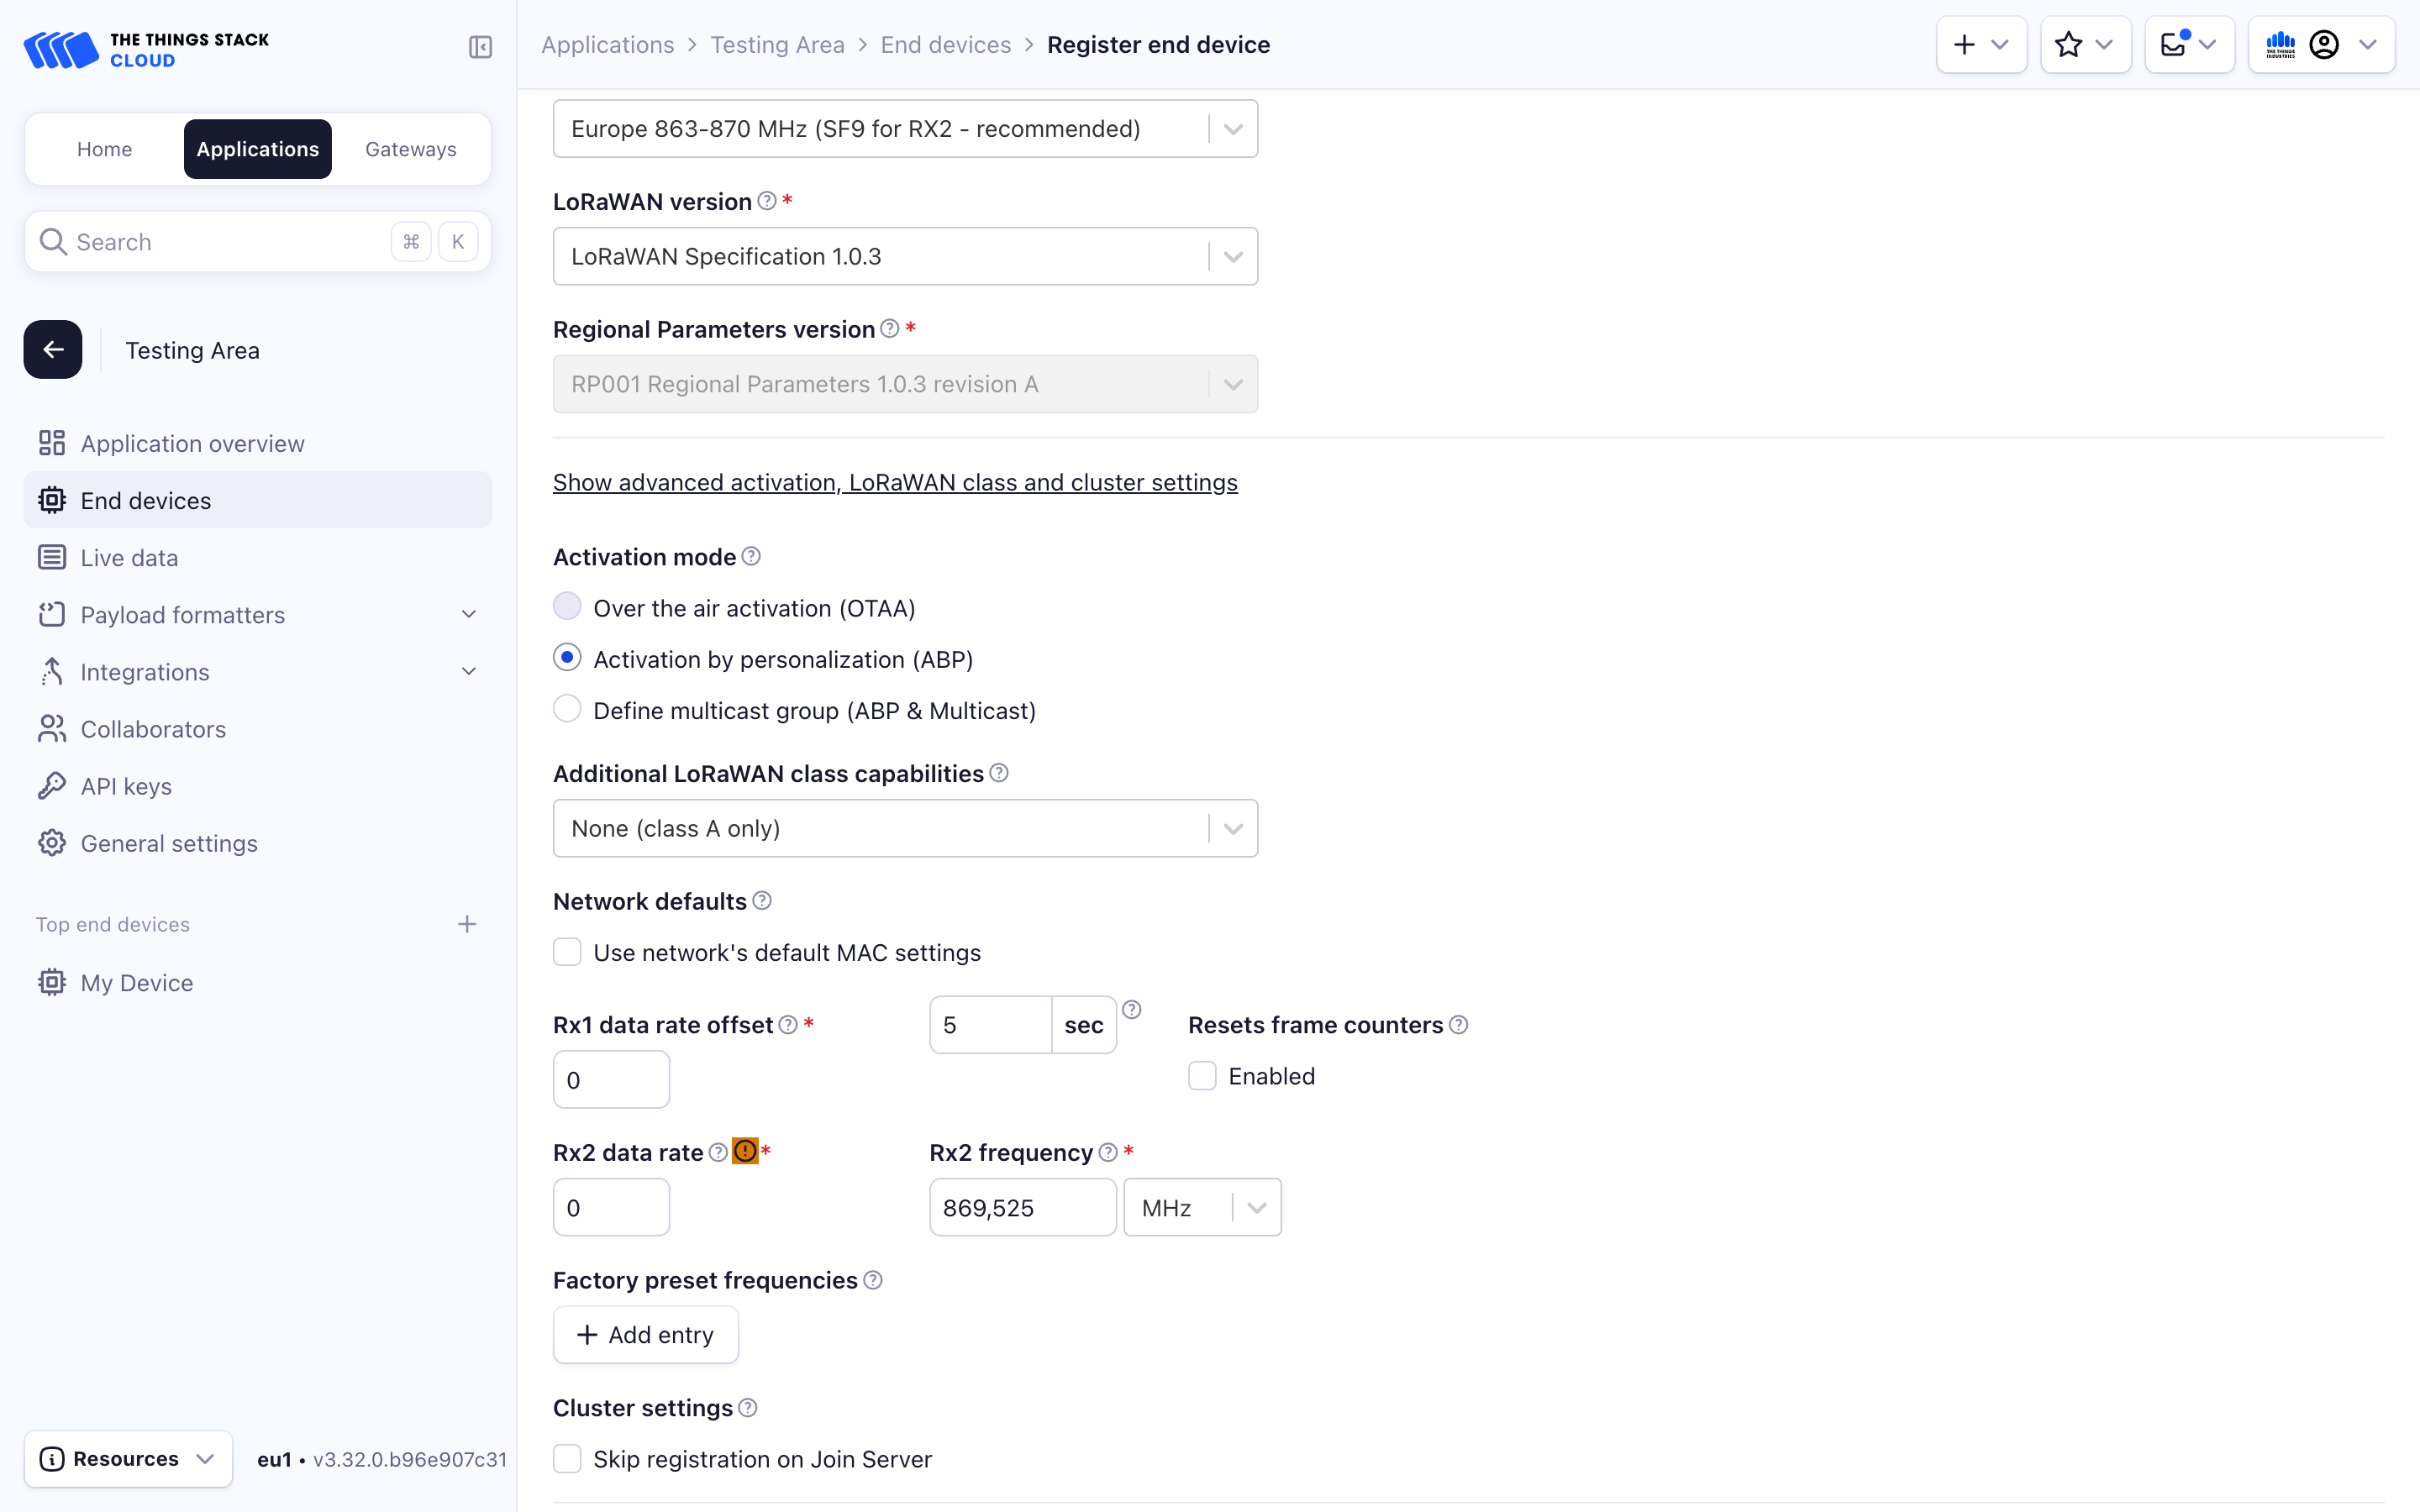
Now proceed with Provisioning information. Enter a JoinEUI/AppEUI if provided by your manufacturer. If it is not provided by the manufacturer and your device is programmable, you can generate a random one in accordance with the test ranges defined by the IEEE 802 standards or use all zeros, just make sure to program the same value into your device. Then click Confirm.
Enter your DevEUI. This should be provided by your manufacturer for commercial devices. If your device is programmable, you may generate an EUI using the Generate button, and program it in your device.
Use the Generate button to create a Device address, and program it in your device.
For LoRaWAN versions 1.0.x, generate an AppSKey and NwkSKey and program them in your device.
For LoRaWAN versions 1.1.x, generate an AppSKey, FNwkSIntKey, SNwkSIntKey, and NwkSEncKey, and program them in your device.
Finally, give your device a unique End device ID. See ID and EUI constraints for guidelines about choosing a unique ID.
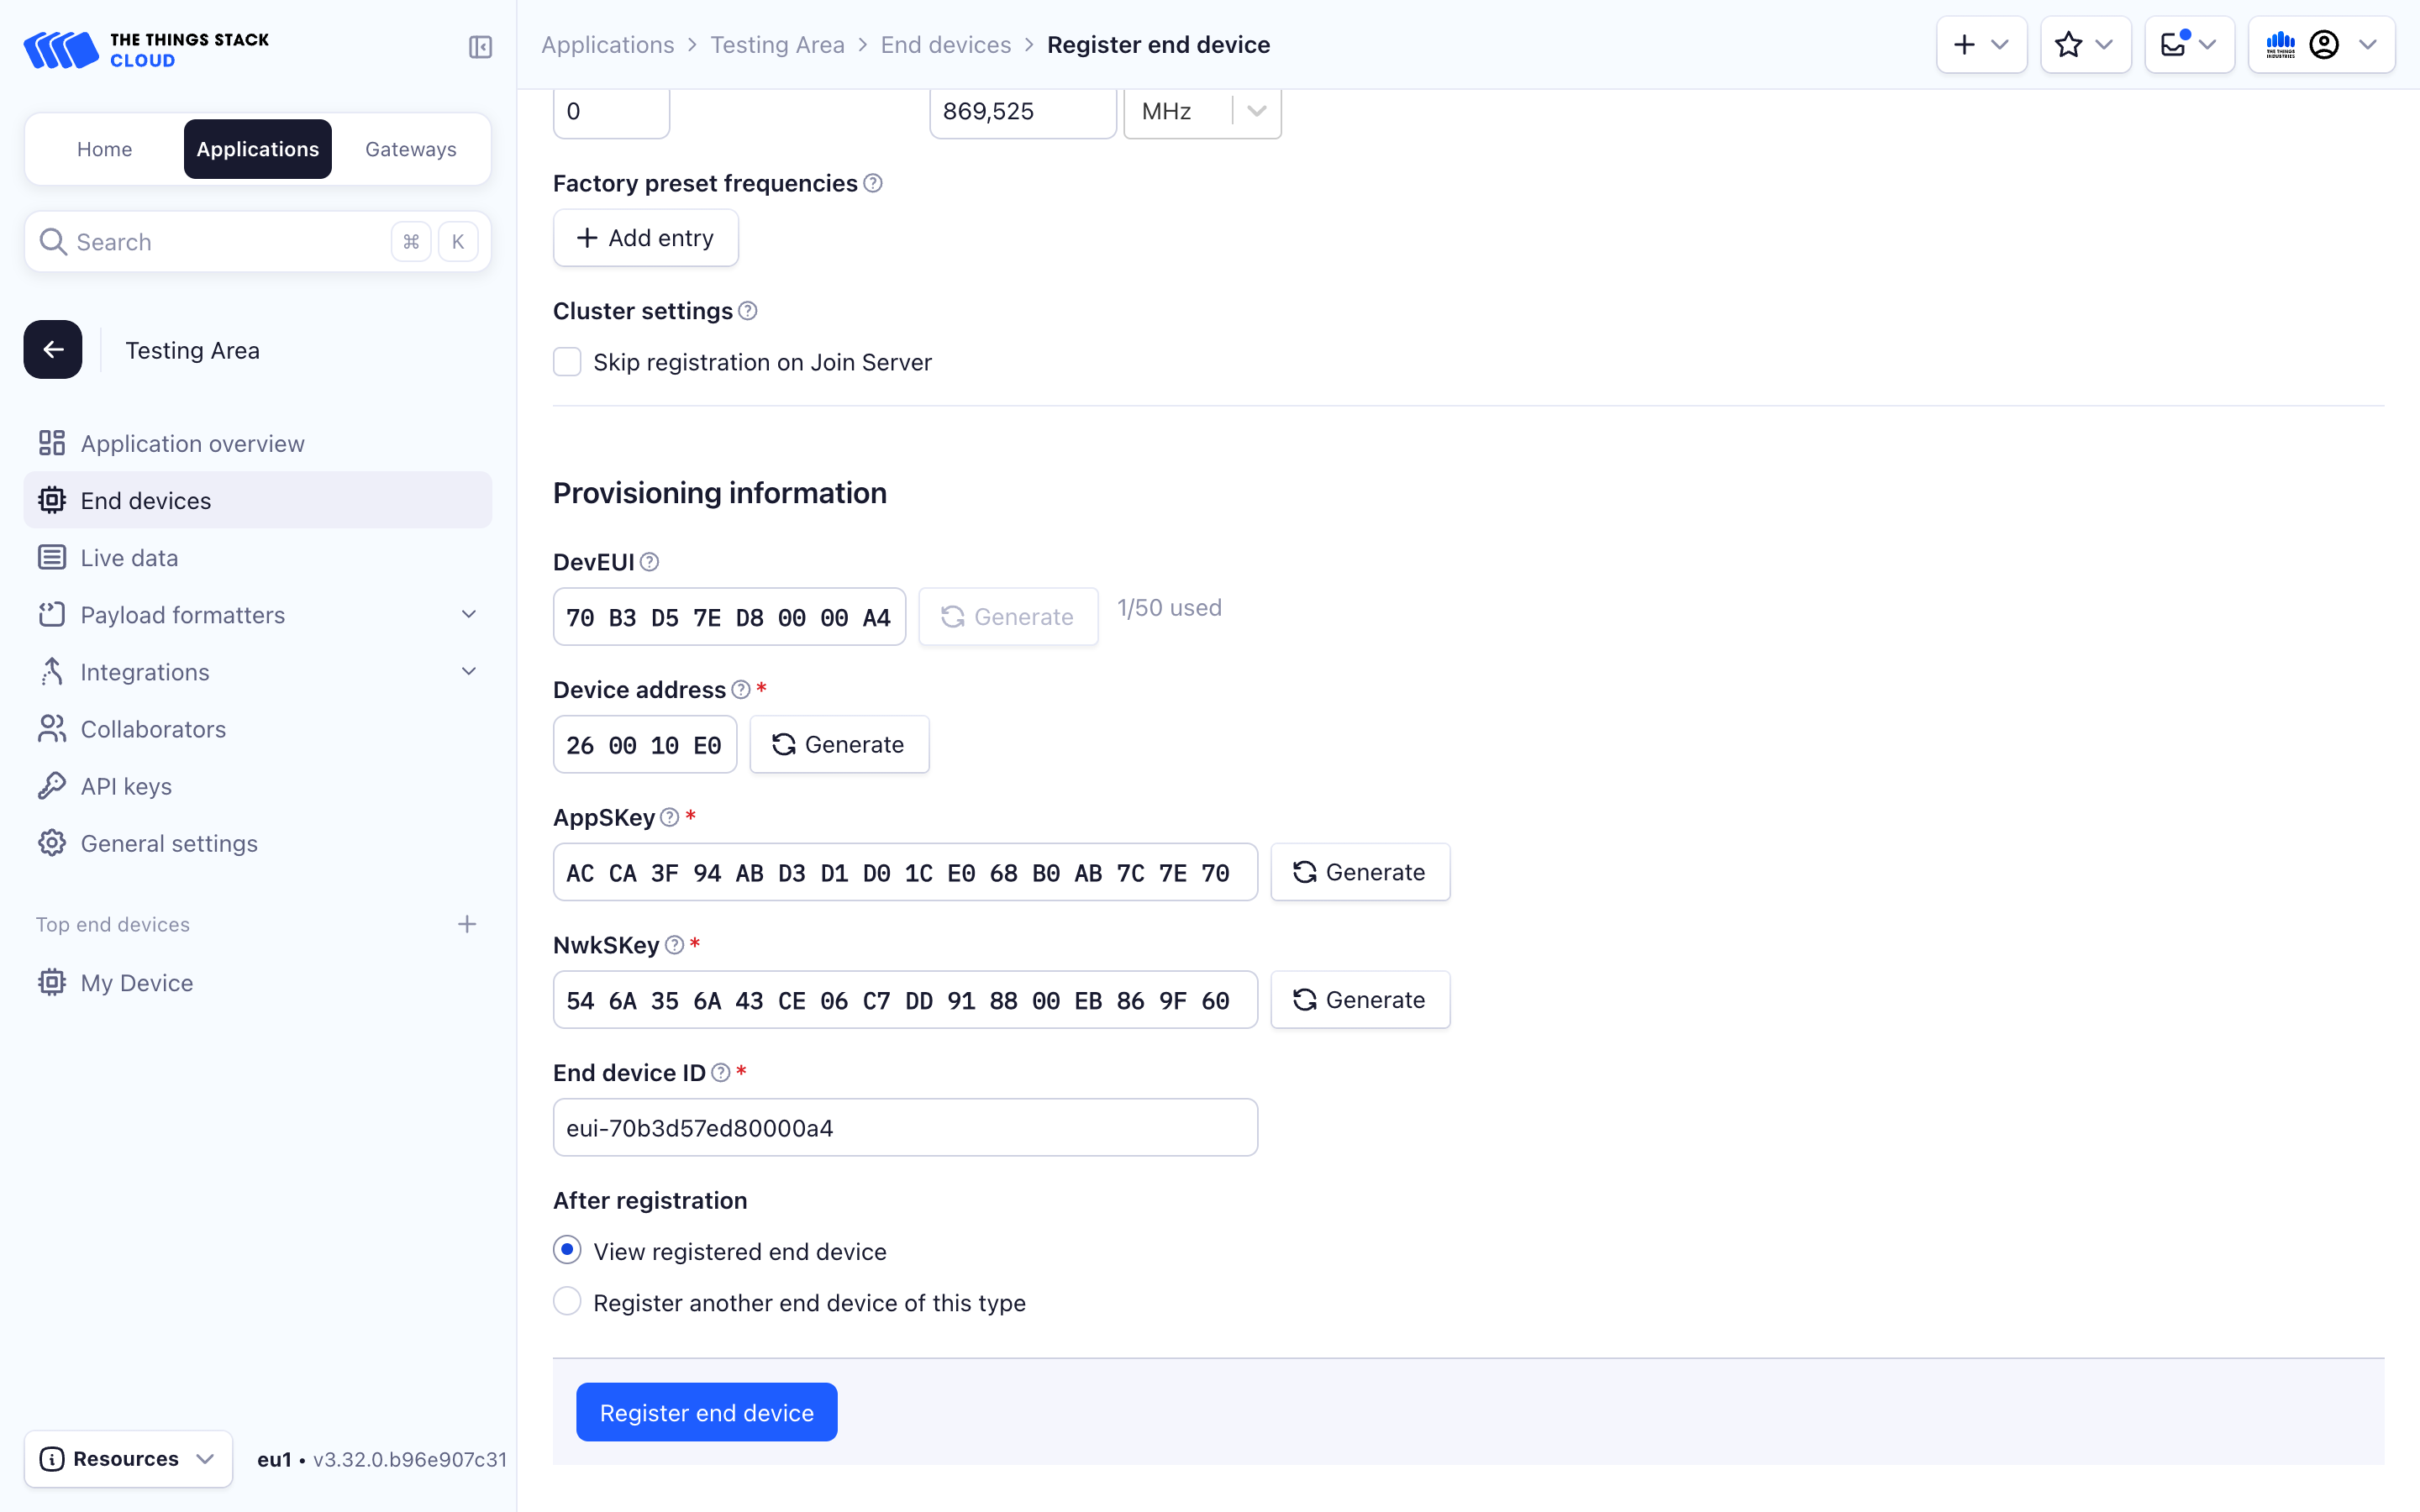
Click Register end device to create the end device.
First, list the available frequency plans and LoRaWAN versions:
ttn-lw-cli end-devices list-frequency-plans
ttn-lw-cli end-devices create --help
For adding ABP devices, we can define the following parameters:
APP_ID="app1"
DEVICE_ID="dev1"
FREQUENCY_PLAN="EU_863_870"
DEV_ADDR="00E4304D"
APP_SESSION_KEY="A0CAD5A30036DBE03096EB67CA975BAA"
NWK_SESSION_KEY="B7F3E161BC9D4388E6C788A0C547F255"
Make sure you modify these according to your setup.
LoRaWAN 1.0.x:
It is also possible to register an ABP activated device using the --abp flag as follows:
ttn-lw-cli end-devices create $APP_ID $DEVICE_ID \
  --frequency-plan-id $FREQUENCY_PLAN \
  --lorawan-version 1.0.3 \
  --lorawan-phy-version 1.0.3-a \
  --abp \
  --session.dev-addr $DEV_ADDR \
  --session.keys.app-s-key.key $APP_SESSION_KEY \
  --session.keys.nwk-s-key.key $NWK_SESSION_KEY
This will create an end device dev1 in application app1 with the EU_863_870 frequency plan, that uses LoRaWAN 1.0.3 MAC and 1.0.3-a PHY versions. Make sure you replace these versions according to your setup.
Please note that the NwkSKey is returned as f_nwk_s_int_key (The Things Stack uses LoRaWAN 1.1 terminology).
You can also pass --with-session to have a session generated.
LoRaWAN 1.1.x:
To register a LoRaWAN 1.1.x end device using ABP:
F_NWK_SESSION_INT_KEY="01020304050607080102030405060708"
S_NWK_SESSION_INT_KEY="01020304050607080102030405060708"
NWK_SESSION_ENC_KEY="01020304050607080102030405060708"
ttn-lw-cli end-devices create $APP_ID $DEVICE_ID \
  --frequency-plan-id $FREQUENCY_PLAN \
  --lorawan-version 1.1.0 \
  --lorawan-phy-version 1.1.0-b \
  --abp \
  --session.dev-addr $DEV_ADDR \
  --session.keys.app-s-key.key $APP_SESSION_KEY \
  --session.keys.nwk-s-key.key $NWK_SESSION_KEY
  --session.keys.f-nwk-s-int-key.key $F_NWK_SESSION_INT_KEY \
  --session.keys.s-nwk-s-int-key.key $S_NWK_SESSION_INT_KEY \
  --session.keys.nwk-s-enc-key.key $NWK_SESSION_ENC_KEY
This will create an end device dev1 in application app1 with the EU_863_870 frequency plan, that uses LoRaWAN 1.1.0 MAC and 1.1.0-b PHY versions. Make sure you replace these versions according to your setup.
You can also pass --with-session to have a session generated.
The Things Stack stores end device data on the Identity Server, Application Server, Network Server. Since ABP devices do not have the concept of join, the Join Server is not used.
Note:
These examples only set a few basic fields. For the full list of customization options, check the linked references.Make sure to follow the same order in creating the devices across the servers.
First, create the device on the Identity Server. Create an is.json file in the same folder.
{
  "end_device": {
    "ids": {
      "device_id": "test-device-abp",
      "dev_eui": "0000000000000011"
    },
    "join_server_address": "thethings.localhost",
    "network_server_address": "thethings.localhost",
    "application_server_address": "thethings.localhost"
  },
  "field_mask": {
    "paths": [
      "join_server_address",
      "network_server_address",
      "application_server_address",
      "ids.dev_eui"
    ]
  }
}
Then make a POST request to the /api/v3/applications/{end_device.ids.application_ids.application_id}/devices end point.
curl -X POST -H "Content-Type: application/json" -H "Authorization: Bearer $API_KEY" \
-d @./is.json \
 https://thethings.example.com/api/v3/applications/my-test-app/devices
{"ids":{"device_id":"test-device-abp","application_ids":{"application_id":"my-test-app"},"dev_eui":"0000000000000011"},"created_at":"2024-01-10T14:51:53.281866Z","updated_at":"2024-01-10T14:51:53.281867Z","version_ids":{},"network_server_address":"thethings.localhost","application_server_address":"thethings.localhost","join_server_address":"thethings.localhost","lora_alliance_profile_ids":{}}
Now create the device on the Network Server. Create an ns.json file with the following example contents. Note that you need to set the correct LoRaWAN settings for the device on the Network Server. Also, since this is ABP, we also set the Network Session Keys.
{
  "end_device": {
    "supports_join": false,
    "lorawan_version": "1.0.2",
    "ids": {
      "device_id": "test-device-abp",
      "dev_eui": "0000000000000011"
    },
    "session": {
      "keys": {
        "f_nwk_s_int_key": {
          "key": "11223344556677881122334455667788"
        }
      },
      "dev_addr": "12345678"
    },
    "mac_settings": {
      "resets_f_cnt": true,
      "factory_preset_frequencies": [
        "868100000",
        "868300000",
        "868500000",
        "867100000",
        "867300000",
        "867500000",
        "867700000",
        "867900000"
      ]
    },
    "resets_f_cnt": false,
    "lorawan_phy_version": "1.0.2-b",
    "frequency_plan_id": "EU_863_870_TTN"
  },
  "field_mask": {
    "paths": [
      "supports_join",
      "lorawan_version",
      "ids.device_id",
      "ids.dev_eui",
      "session.keys.f_nwk_s_int_key.key",
      "session.dev_addr",
      "mac_settings.resets_f_cnt",
      "mac_settings.factory_preset_frequencies",
      "lorawan_phy_version",
      "frequency_plan_id"
    ]
  }
}
Make a PUT request to the /api/v3/ns/applications/{end_device.ids.application_ids.application_id}/devices/{end_device.ids.device_id} end point.
curl -X PUT -H "Content-Type: application/json" -H "Authorization: Bearer $API_KEY" \
-d @./ns.json \
 https://thethings.example.com/api/v3/ns/applications/my-test-app/devices/test-device-abp
{"ids":{"device_id":"test-device-abp","application_ids":{"application_id":"my-test-app"},"dev_eui":"0000000000000011","dev_addr":"12345678"},"created_at":"2024-01-10T14:53:22.649080Z","updated_at":"2024-01-10T14:53:22.649080Z","lorawan_version":"MAC_V1_0_2","lorawan_phy_version":"PHY_V1_0_2_REV_B","frequency_plan_id":"EU_863_870_TTN","mac_settings":{"factory_preset_frequencies":["868100000","868300000","868500000","867100000","867300000","867500000","867700000","867900000"],"resets_f_cnt":true},"session":{"dev_addr":"12345678","keys":{"f_nwk_s_int_key":{"key":"11223344556677881122334455667788"}}}}
Now create the device on the Application Server. Create an as.json file with the following example contents.
We also set the application session key here.
{
  "end_device": {
    "ids": {
      "device_id": "test-device-abp",
      "dev_eui": "0000000000000011"
    },
    "session": {
      "keys": {
        "app_s_key": {
          "key": "11223344556677881122334455667788"
        }
      },
      "dev_addr": "12345678"
    },
    "skip_payload_crypto": false
  },
  "field_mask": {
    "paths": [
      "ids.device_id",
      "ids.dev_eui",
      "session.keys.app_s_key.key",
      "session.dev_addr",
      "skip_payload_crypto"
    ]
  }
}
Make a PUT request to the /api/v3/as/applications/{end_device.ids.application_ids.application_id}/devices/{end_device.ids.device_id} end point.
curl -X PUT -H "Content-Type: application/json" -H "Authorization: Bearer $API_KEY" \
-d @./as.json \
 https://thethings.example.com/api/v3/as/applications/my-test-app/devices/test-device-abp
{"ids":{"device_id":"test-device-abp","application_ids":{"application_id":"my-test-app"},"dev_eui":"0000000000000011"},"created_at":"2024-01-10T14:55:13.479196Z","updated_at":"2024-01-10T14:55:13.479196Z","session":{"dev_addr":"12345678","keys":{"app_s_key":{"key":"11223344556677881122334455667788"}}}}