Skip to content
The Things Stack documentation home
Getting Started Concepts Cloud Enterprise Integrations API Hardware
Getting Started Concepts
Cloud Enterprise
Integrations API Hardware
Get The Things Stack

    Recent searches

      Popular pages

      • Getting Started
      • Adding Gateways
      • Adding Devices
      • Payload Formatters
      • Webhooks
      • Authentication

      No results for “”.

      • Check the spelling, or try fewer or more general words.
      • Ask the community on The Things Network Forum
      • Contact support
      ↑↓ to navigate ↵ to open Esc to close

      Integrations

      • Overview
      • Adding Applications
      • Data Formats
      • Payload Formatters
      • Webhooks
      • Storage Integration
      • Integrate with popular IoT platforms
        • akenza
        • AllThingsTalk Maker
        • AnyViz
        • AWS IoT
        • Azure IoT Central
        • Azure IoT Hub
        • Blockbax
        • Blynk
        • Cayenne
        • Cloud Studio
        • Daizy
        • Datacake
        • Delmation Products
        • deZem
        • evrlast
        • Homey
        • InfluxDB Cloud 2.0
        • IoT in a Box
        • IoT Wonderland
        • Kaa
        • Losant IoT Platform
        • MClimate
        • my IoT open Tech
        • Qubitro
        • TagoIO
        • Telemetry2U
        • Tellsens
        • thethings.iO
        • Thinger.io
        • ThingsBoard
        • ThingSpeak
        • TTN Mapper
        • Ubidots
        • UIB
        • UnaConnect
        • Widgelix
        • Withthegrid
        • Zoho IoT
      • Other integrations
      • Application Packages
      • Examples

      Telemetry2U

      Updated 19 April 2023 Edit on GitHub
      Copy page
      • View as MarkdownThis page as plain text
      • Open in ChatGPTAsk questions about this page
      • Open in ClaudeAsk questions about this page

      Telemetry2U is a complete IoT platform that requires little setup and configuration yet still provides advanced features, such as voice alerts, scheduled audit reports, configurable real-time dashboards and even calibrations.

      Prerequisites

      1. A user account on Telemetry2U.
      2. Activated 14-day free trial or a PAYG plan on Telemetry2U.

      Setup Telemetry2U

      First login to your Telemetry2U account and navigate to Node Maintenance via Admin tab from the top menu.

      Click the Create New link in the top right corner to add a new LoRaWAN® device.

      Next, you need to complete the device creation form. The Description, Profile, Device EUI, Network Provider and Device Configuration are required fields. If your device is currently unsupported leave Device Configuration at the default value. Click the Create button to finish.
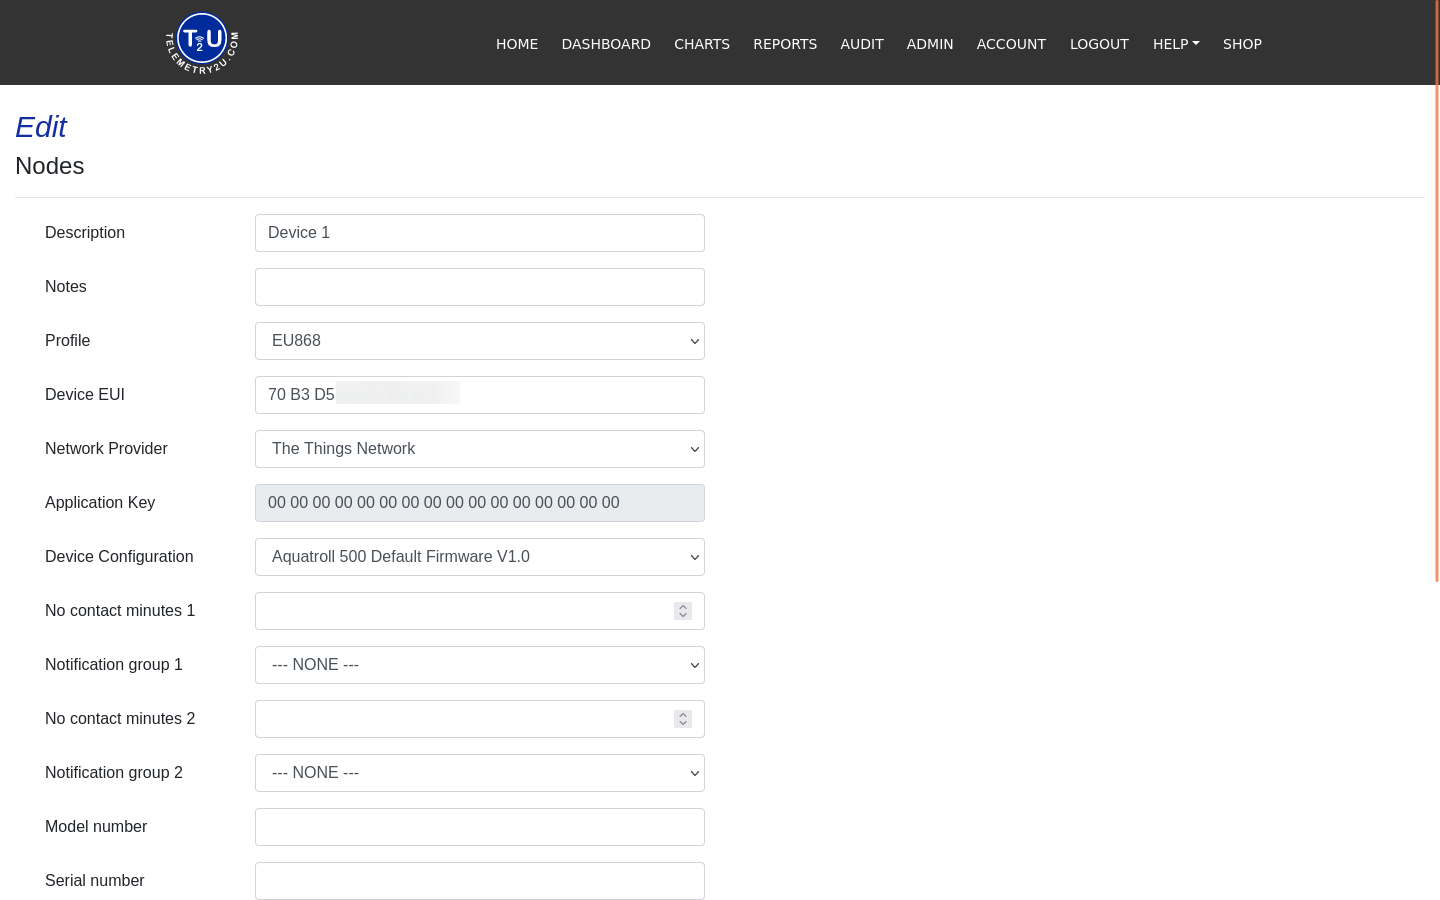
      Add a device in Telemetry2U

      Configure the Integration on The Things Stack and Telemetry2U

      From your Telemetry2U account, navigate to Setup Integration via Admin tab from the top menu. Select The Things Network from the Network Provider drop down menu and hit the Add Integration button.

      Select the Region your The Things Stack account is registered under.

      Next, make a copy of the Telemetry2U Token using the Copy to clipboard button.

      Retrieve The Things Stack application ID and enter it into the Application ID field.

      To obtain the API Key, you need to configure the integration on The Things Stack end first.
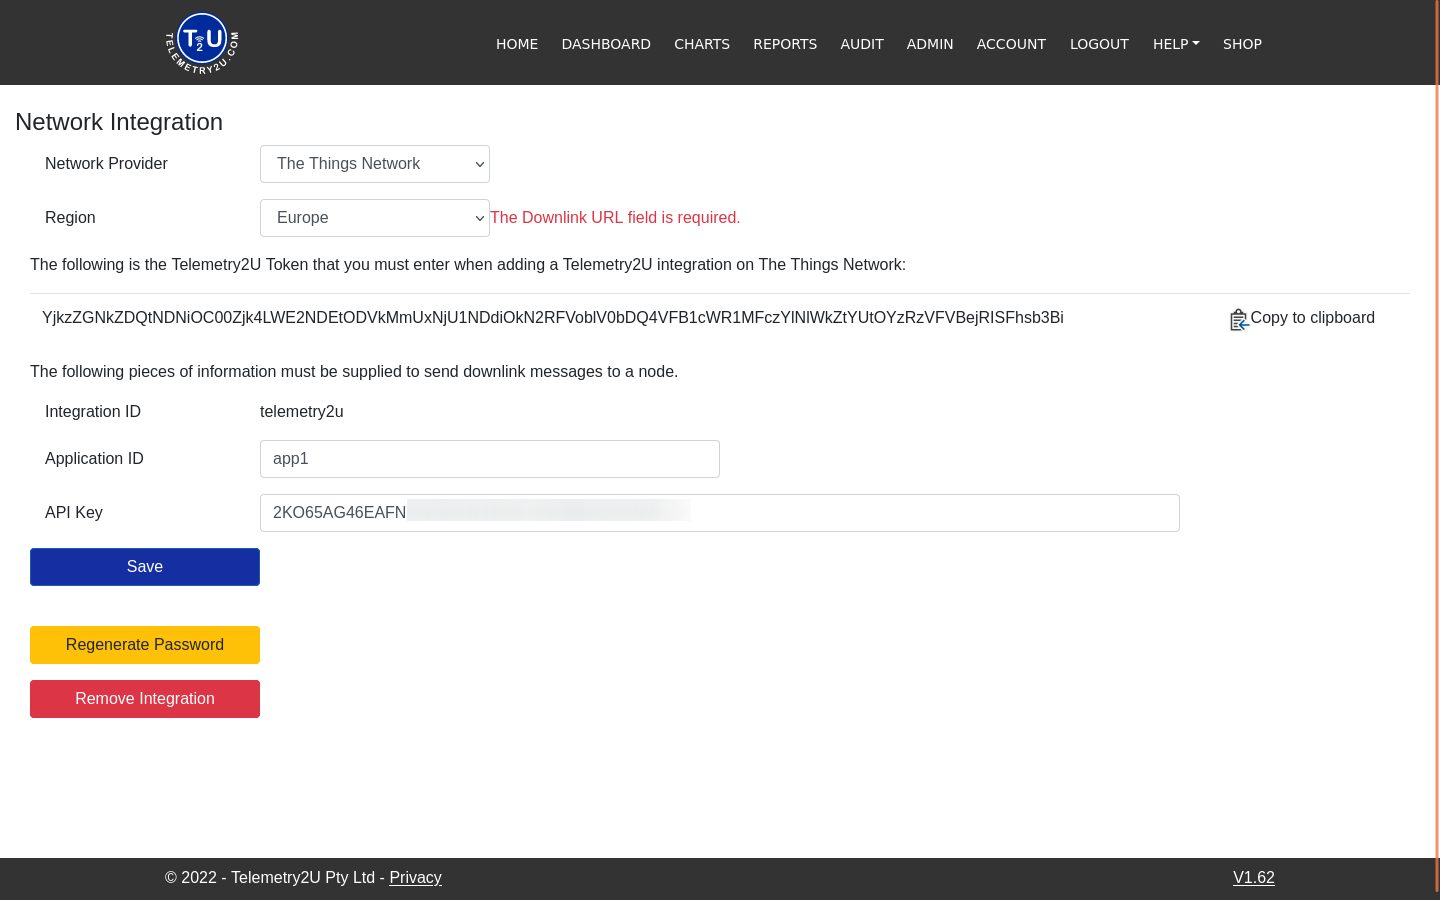
      Setup the integration

      Log into The Things Stack and open your application. Using the left hand menu, navigate to Webhooks under Integrations on the left hand menu and click the Add webhook button in the top right corner. Choose the Telemetry2U Webhook template.

      Use telemetry2u as the Webhook ID and enter the Telemetry2U Token you copied to the clipboard in earlier steps.
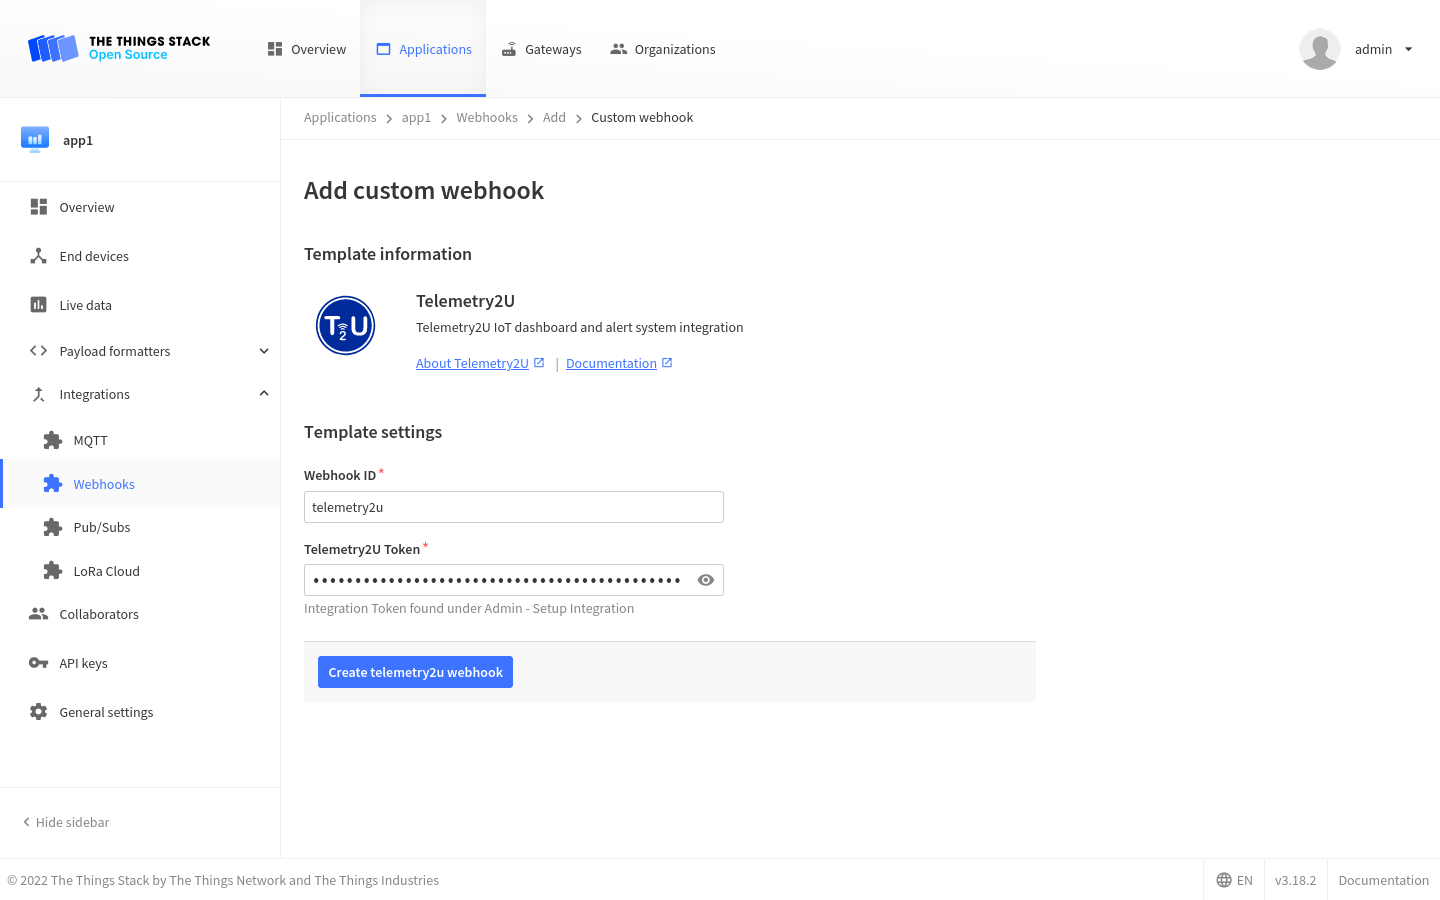
      Telemetry2U webhook template

      When you have created the integration, use The Things Stack left hand menu to navigate to API Keys, select the downlink API key that was automatically created upon instantiating the Telemetry2U Webhook template and copy its Key ID .
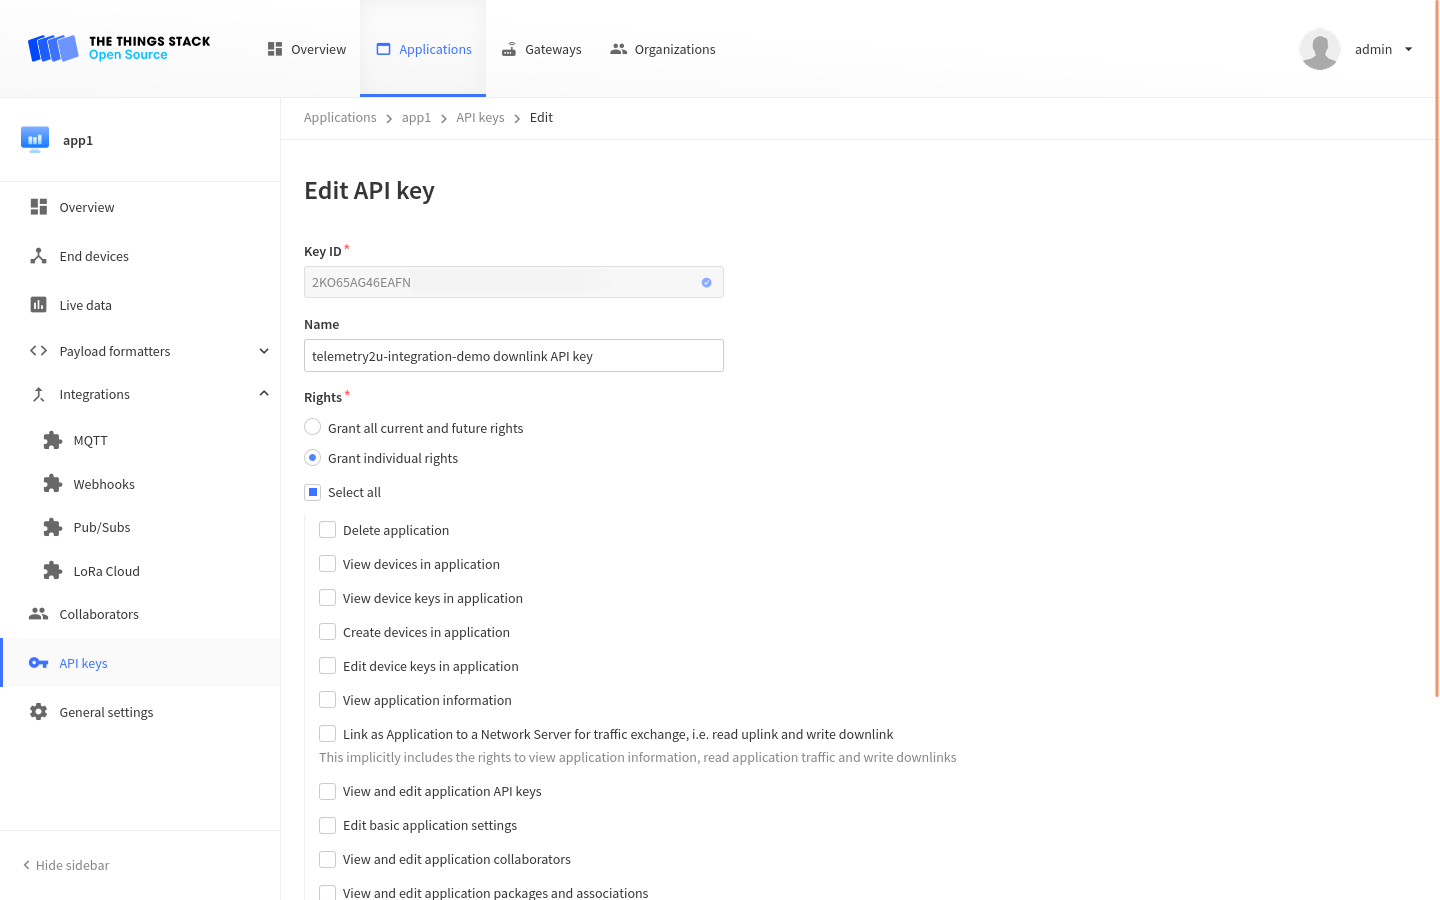
      TTN API

      Now go back to Telemetry2U and paste the key ID you copied into the API Key field in the integration configuration page.

      Click the Save button to complete the integration. Congratulations! Your integration is now complete and once data has been received by The Things Stack, it should become available under the Telemetry2U Reports Page.

      Note:

      If you’re using an unsupported device on Telemetry2U, you can select Raw Data as the report type to confirm data is being received. You may then forward a copy of the device documentation including the payload format and device EUI to Telemetry2U support via email and they will get your device’s support added ASAP.
      ← TagoIO Tellsens →

      On this page

      • Prerequisites
      • Setup Telemetry2U
      • Configure the Integration on The Things Stack and Telemetry2U

      Sections

      Getting Started

      Concepts

      Cloud

      Enterprise

      Integrations

      API

      Hardware

      Sitemap

      View our Sitemap

      Contributing

      GitHub

      About Us

      The Things Industries

      Privacy Policy

      Cookie settings

      Cookie Settings

      We use cookies to enhance your experience, analyze site traffic and deliver personalized content. Read our Privacy Policy.

      Cookie categories